This past weekend was full of preparing for Lyndsey's bridal shower that's happening this weekend and crafts that make our house feel more like home :)
For the first craft, I got some things that we had sitting around the house all wrangled up and decided to throw them together. I had multiple white frames left over from our wedding so I snatched up the one that we used to display our bar selections:
I also used a small piece of burlap that was left over from decorating for Lyndsey's shower, a piece of scrapbook paper and a wooden "D" that I had intended to use for a wreath but it was too heavy, plus I didn't know how to attach it to a wreath made out of twigs... sue me.
As you can see, it was already painted a light brown but, I wanted something different. I found some stainless steel spray paint that El Hubbo and I used for a previous project. So, I propped up the "D" on a pair of Sean's jack stands and set it in the dead grass and sprayed away.... excessively. So excessively that the paint began to pucker and look all kinds of crazy. At first I was bummed and thought I ruined it, but then I thought it looked sorta cool! So I continued to spray. spray some more. and then spray even more on top of that until I got this crazy texture:
I think it looks pretty cool (much cooler in person). I left it outside to dry for a while and worked on the frame in the meantime.
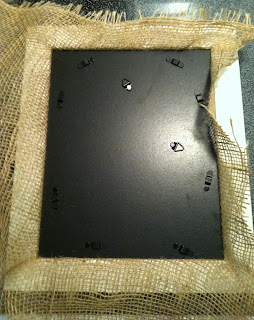
I started this process by taking all the guts out of the frame and laying my cut piece of burlap over the backside of the frame. I made sure to cut it bigger than what would be displayed so I could work with it.
I then took the piece of scrapbook paper, cut it to size and shoved it, along with the backing of the frame, in place.
Now, because real burlap is ten different kinds of crazy and the threads go whatever way they want to go, I flipped it over and pulled it taunt with the fabric that was hanging out, like so:
Once it's pulled tight and there aren't any more bulges in the fabric, cut the excess hanging out. Ta da!
Once the "D" was all dry, I placed it in the frame to scope out where it looked most centered and used some super glue to keep it in place. Using hot glue crossed my mind but because the "D" had some weight to it and the burlap wasn't the strongest, I used super glue that would adhere to the burlap and the scrapbook paper underneath. This "D" wasn't going anywhere.
After pressing it down to adhere to the burlap and the paper for a little while, I let it sit to get a good bond. Awe, bonding time :)
I waited for about 30 minutes, held it upside down to test it and it was dry! For now, it's sitting on our entry-way table. Once I get some shelves up in the bedroom I'm going to display our moniker in there, but until then, this is it's home:
I'll be back tomorrow with another project that got completed over the weekend :)
-C Doc


No comments:
Post a Comment